안녕하세요!
오늘은 딥러닝에서 가장 간단하게 체험해 볼 수 있는 시간을 가져보려고 해요.
이름하여 10가지 동물 사진 분류하기!
📍 딥러닝 동물 사진 분류하기

컴퓨터 딥러닝을 이용해서 10가지의 동물 사진을 학습시키고 사진을 컴퓨터에게 입력했을 때 어떤 동물로 예측하는지 확인하는 실습이에요.
사진을 보고 동물을 맞추는 분류작업이고 10가지의 종류가 되니 다중 분류가 되겠습니다.
📌 구글 드라이브와 colab
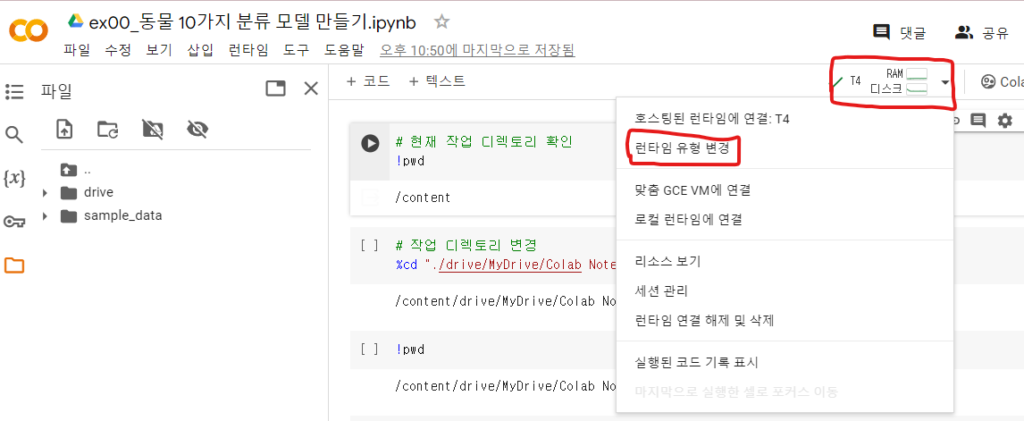
저는 일반적으로 파이썬 코드를 작성할 땐 VScode나 jupyter notebook을 사용하는데 딥러닝은 GPU를 많이 사용하다 보니 컴퓨터가 엄청 좋지 않은 이상 일반 가정용 컴퓨터로는 구현이 되지 않는 작업이 될 수 있어요.
그래서 구글이 클라우드 서비스로 GPU를 대여해 주는 colab과 데이터를 저장할 수 있는 구글 드라이브로 쉽게 딥러닝을 사용하실 수 있어요.
다만 무료 버전은 사용할 수 있는 GPU가 한정적이니 메모리를 잘 확인하면서 학습을 시키는 것이 좋아요.
신경 쓰지 않으실 분들은 월 치킨 값의 구독료를 내시면 메모리도 높고 더 성능이 좋은 GPU를 사용할 수 있어요.
google colab에서 파일을 하나 만드시면 구글 드라이브에서 확인할 수 있는데 그다음 구글 드라이브와 연동할 수 있습니다.
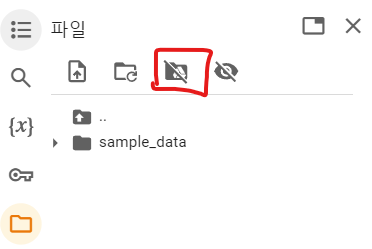
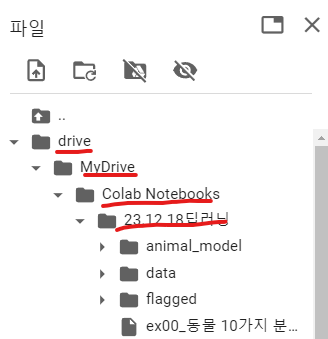
구글 드라이브와 연결하기 위해선 왼쪽에 있는 폴더를 누르고 빨간색 네모칸이 있는 버튼을 눌러야 해요.
파일 경로를 사진과 같이 만들었고, GPU를 무료 버전인 T4로 변경했습니다.
# 현재 작업 디렉터리 확인
!pwd
# /content로 나올 것임

# 작업 디렉터리 변경
%cd "./drive/MyDrive/+ colab 파일을 만든 경로를 적어주세요" #사용자마다 경로가 다름
기본 작업 디렉터리가 /content이기 때문에 colab 파일이 있는 곳으로 작업 디렉터리를 변경을 해줍니다.
📌 라이브러리 import
# 라이브러리 로딩
import numpy as np
import pandas as pd
import matplotlib.pyplot as plt

from tqdm import tqdm # 진행률을 시각화해주는 도구 (파이썬에서 몇 번 반복했는지 쉽게 볼 수 있음)
from tensorflow.keras.utils import image_dataset_from_directory # 폴더에서 이미지를 불러오는 도구

# 훈련/평가용 데이터 분리 함수
from sklearn.model_selection import train_test_split # 훈련/평가용 데이터 분리 함수

# 이미지 특징을 추출하는 도구
from tensorflow.keras.applications import InceptionV3 # 이미지 특징을 추출하는 도구

# 신경망 모델 import
from tensorflow.keras.models import Sequential # 딥러닝 모델의 뼈대
from tensorflow.keras.layers import Dense # 뉴런의 묶음을 표현하는 클래스 뉴런을 이용해서 모델을 만들 때 성능은 좋지만 최대한 가볍게 만들어야 함
from tensorflow.keras.callbacks import EarlyStopping # 조기학습 중단 비효율로 시간을 낭비하지 않게 함
from tensorflow.keras.callbacks import ModelCheckpoint # 모델자동 저장 과대 적합을 피하기 위해 미리 자동으로 저장

# 예측과 평가
from tensorflow.keras.models import load_model # hdf5 포맷의 모델파이를 로딩하는 함수
from sklearn.metrics import classification_report # 분류 평가 지표 확인 함수
우선 머신러닝과 딥러닝을 사용하기 위해 파이썬 라이브러리를 불러오는 코드입니다.
라이브러리마다 주석을 달았으니 참고해 주세요.
📌 데이터 로딩
total_data = image_dataset_from_directory(
    directory = "./data/animal_sample/small/", # 읽어들일 경로 지정
    labels = "inferred", # 폴더명을 인식해서 정답으로 붙여준다.
    label_mode = "categorical", # 다중 분류 형태로 인식 > 정답 포맷도 다중 분류용 포맷으로 설정
    color_mode = "rgb", # 컬러사진 설정
    image_size = (224,224) # 이미지 크기 리사이징
)

# 32개씩(배치 사이즈) 데이터 읽기
# 배치 사이즈 : 효율적인 메모리 관리를 위해 데이터를 작은 크기로 나누어 관리하는 개념
for img, label in tqdm(total_data.as_numpy_iterator()) :
  X_data.append(img) # 훈련 데이터
  y_data.append(label) # 정답 데이터


# 리스트에 32개씩 담긴 데이터를 하나의 numpy로 통합
X_numpy = np.concatenate(X_data)
y_numpy = np.concatenate(y_data)
X_numpy.shape, y_numpy.shape
필요한 라이브러리를 불러왔다면 컴퓨터에 학습시킬 데이터가 필요해요.
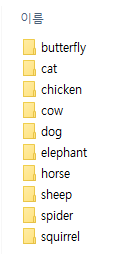
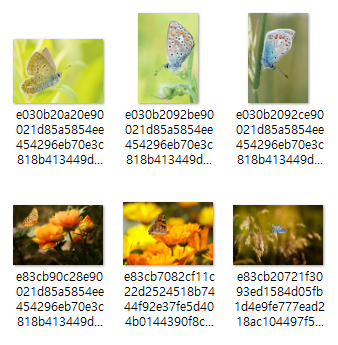
머신러닝 데이터를 가져올 수 있는 kaggle에서 동물 사진을 받아왔어요.
총 2만 장 이상이 되지만 1종류마다 500장으로 줄였어요.
📌 훈련/평가 데이터 분리
X_train,X_test,y_train,y_test = train_test_split(X_numpy, y_numpy, # 훈련용 X, 정답용 y
                                                 test_size=0.2, # 80:20 비율로 나눔
                                                 random_state=1219) # 랜덤 프리셋(아무 값이나 가능)

# 훈련용 데이터 shape 확인
X_train.shape, y_train.shape

# 평가용 데이터 shape 확인
X_test.shape, y_test.shape
학습시킬 데이터를 가져왔다면 다음은 훈련용 데이터와 정답 데이터를 나눠야 해요.
저희는 종류마다 학습시킬 사진이 부족해서 보통은 7:3으로 나누지만 8:2로 나눴어요.
📌 이미지 전처리
ImageEmbedding = InceptionV3(
    include_top = False,
    weights="imagenet",
    input_shape=(224,224,3), # 이미지 특징을 추출할 데이터의 크기(모양)
    pooling='avg'
)
다음 이미지의 특징을 잘 추출하기 위해 InceptionV3 함수를 사용했어요.
또 이미지 크기를 조절해서 전처리 과정을 거쳤습니다!
📌 모델 설계
animal_model = Sequential() # 뼈대 생성
animal_model.add(ImageEmbedding) # 이미지 특징추출 도구 연결
animal_model.add(Dense(units=128, activation='relu')) # Dense -> 뉴런의 묶음 units에 숫자 바꿔도 됨
animal_model.add(Dense(units=256, activation='relu')) # Dense -> 뉴런의 묶음 원하는 만큼 뉴런 생성
animal_model.add(Dense(units=128, activation='relu')) # Dense -> 뉴런의 묶음 활성화 함수(relu)
animal_model.add(Dense(units=10, activation='softmax')) # 마지막 뉴런의 수는 y 종류의 수와 같아야 함

# 모델의 요약정보 확인
animal_model.summary()
다음은 딥러닝 모델 설계에요.
Sequential이라는 함수를 사용해서 딥러닝의 뼈대를 생성하고 그 안에 Dense라는 함수를 사용해서 뉴런을 붙이는 방식이에요.
뉴런의 수는 원하는 만큼 사용하면 되지만 마지막에는 동물 10가지를 사용했기 때문에 10개로 맞춰줬습니다.
또 다중 분류 방식이기 때문에 softmax를 사용했습니다.
animal_model.compile(loss="categorical_crossentropy", # 모델의 잘못된 정도(오차)를 측정하는 도구
                     optimizer="adam", # 모델 최적화 도구 -> 경사하강법 알고리즘
                     metrics=['accuracy'] # 모델의 평가 지표
                     )

early = EarlyStopping(monitor="val_accuracy", # 모델의 성능을 판단하기 위해 모니터링할 척도
                      patience=5) # 성능 개선 여부를 지켜볼 epoch 횟수(인내심 횟수)

model_path = "./animal_model/animal-{epoch:02d}-{val_accuracy:.2f}.hdf5" # 모델이 저장될 경로 및 파일 이름
mdckp = ModelCheckpoint(filepath = model_path, # 파일 경로 연결
                        save_best_only=True, # 모델의 성능이 최고점을 돌파할 때만 저장
                        monitor="val_accuracy") # 모델의 성능을 판단하기 위해 모니터링할 척도
다음은 딥러닝 모델의 손실 함수와 최적화 평가 지표를 만들기 위해 다중 분류인 categorical_crossentropy를 사용했고 최적화 도구는 현재까지 성능이 좋은 adam, 그리고 평가 지표는 정확도를 사용했습니다.
earlystopping은 한정적인 GPU 자원을 효율적으로 사용하고, 학습하는 시간을 줄이기 위해 더 이상 학습할 필요가 없다면 조기 종료하는 라이브러리에요.
mdckp는 학습을 해도 성능이 줄어드는 경우가 있기 때문에 학습 중간에 가장 성능이 좋았던 모델을 저장하는 라이브러리에요.
📌 모델 학습
h = animal_model.fit(X_train, y_train, # 훈련용 문제, 훈련용 정답
                     validation_split = 0.2, # 검증 데이터 비율 설정
                     epochs=100, # 학습 반복 횟수 설정
                     callbacks=[early,mdckp], # 조기학습 중단, 모델 자동 저장 적용
                     batch_size=16) # 한 번에 RAM 메모리에 적재되는 데이터 수 (기본값 : 32)
모든 준비가 끝났어요!
바로 모델을 학습시켜줍니다.
파라미터는 주석을 참고해 주세요.
학습하는 시간이 생각보다 많이 걸릴 수 있어요.
📌 test데이터 예측 및 모델 평가
# best 모델 로딩
best_animal_model = load_model("./animal_model/animal-16-0.76.hdf5")

# 모델에게 테스트 데이터 예측시키기
pre = best_animal_model.predict(X_test)

# 분류는 항상 확률을 먼저 예측
# 클래스 번호를 보고 싶으면 argmax를 이용
print(pd.Series(pre[0]))
print(np.argmax(pre[0]))
학습이 끝났다면 가장 좋았던 모델을 불러옵니다.
저는 16번째 학습에서 76%의 성능으로 가장 좋은 모델이 나왔어요.
print(total_data.class_names)
# ['butterfly', 'cat', 'chicken', 'cow', 'dog', 'elephant', 'horse', 'sheep', 'spider', 'squirrel']

plt.imshow(X_test[0].astype("int64"))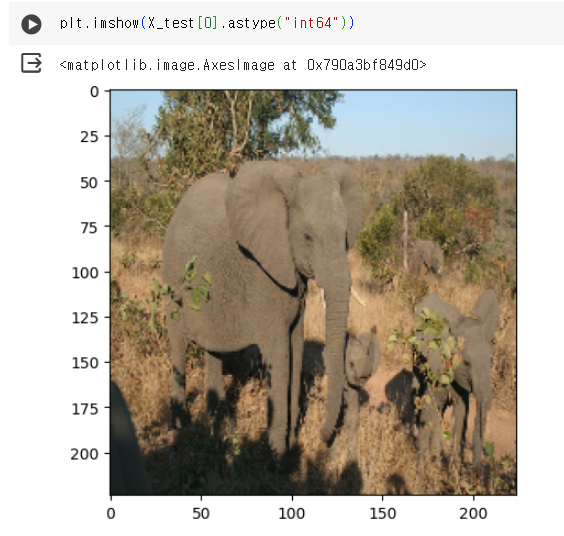
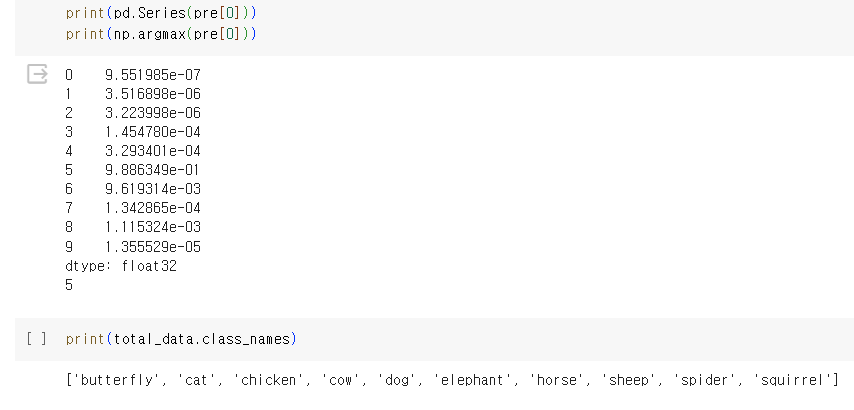
코끼리 사진을 넣었을 때 예측 결과는 5가 나왔고 코끼리라고 예측하고 있어요.
잘 예측이 되었어요.
# 분류 평가 지표 확인
# 재현율 실제 나비 중에서 recall 만큼 정답(recall)
# 정밀도 나비라고 예측한 것 중에서 실제로 정답(precision)
# support 각 종류마다 사진의 수
# f1-score 불균형한 데이터에서 예측을 잘하는지 평가 지표
print(classification_report(y_test.argmax(axis=1),
                                   pre.argmax(axis=1)))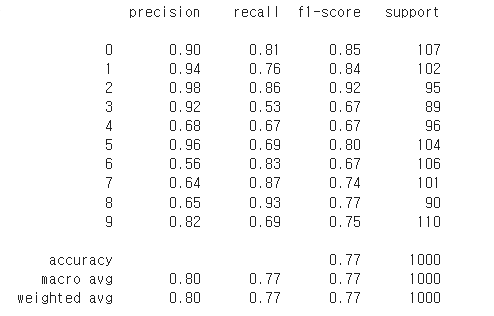
동물의 재현율과 정밀도를 확인해 봤을 때 둘의 차이가 심하게 나면 예측이 좋지 않았다고 해요.
8번의 경우는 재현율이 높고 정밀도가 낮아서 컴퓨터가 거미를 잘 학습하지 못해서 조그만 거미의 특징이 보인다면 다 거미라고 예측하기 때문에 실제 거미에서는 예측이 높지만 거미라고 예측한 사진은 오답이 많아요.
3번의 경우는 정밀도가 높고 재현율이 낮아서 컴퓨터가 소의 특징을 너무 심하게 학습해서 완벽한 소가 나올 때까지 예측하지 못하기 때문에 재현율은 낮고 정밀도는 높아요.
자 이렇게 해서 딥러닝을 이용해서 동물을 분류하는 방법에 대해 알아봤어요.
다른 정보로 찾아뵙겠습니다!